Introducing Twitter Toolkit for SuperAGI. With Twitter Integrated into SuperAGI, you can now deploy agents to
- Send Tweets
- Send Tweets with Images
Installation
🔐 Obtaining API Key and Secret from Twitter Developer Portal
- Log in to your Twitter Developer Portal Account and select your project under the “Projects & Apps” section.
- Proceed with creating a new app. Once you have created the app by adding a name, you will get an API Key and an API Secret, copy that and keep it in a separate text file.
🚪 Configuring OAuth
- Once you have saved the key and the secret, click on “App Settings”
- Once you are on the App Settings Page, start setting up the User Authentication Settings.
- Fill in the details as shown in the below image. Give “Read and Write Permissions” and make it a “Web Application"
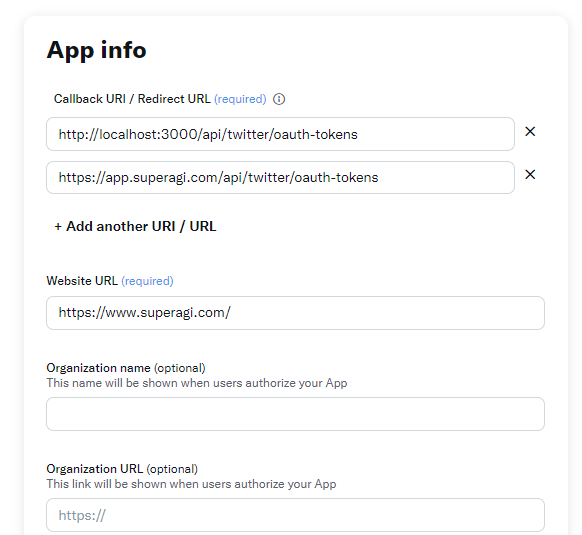
Add the Following Callback URIs and the Website URL as shown in the image below:
https://app.superagi.com/api/twitter/oauth-tokenshttp://localhost:3000/api/twitter/oauth-tokens

Save the settings. you have now configured OAuth Authentication for Twitter.
✅ Configuring Keys and Authenticating in SuperAGI.
In the SuperAGI’s Dashboard, navigate to the Twitter Toolkit Page, add the API Key and API Secret you’ve saved, and click on ‘Update Changes’
- After you’ve updated the changes, click on Authenticate. This will take you to the OAuth Flow. Authorize the app through the flow.
Once you have followed the above steps, you have successfully integrated Twitter with SuperAGI.